Run-Time DirectX11 Render Graph
During my seventh project (second project in second year) we wanted to move parts of the rendering and post-processing pipeline away from myself to our TA team, for a couple of reasons:
I had a number of critical tasks that I had taken responsibility for and they required a high priority over adding or tweaking post-processing effects.
The TAs had gained more experience with writing shader code and a greater understanding of rendering techniques and resources; meaning I could share more of the rendering work with them.
As such I decided I wanted a simple tool that I could hand over so that the Technical artists could create and test rendering effects straight in engine.
Trying to find solutions
I began looking at existing tools and applications; Unity, Unreal, the Game Assembly’s Model viewer. And although they all provide solutions, they were either too large to implement or too complicated to get into for something that was needed within two weeks. The best of the systems for our use case was the model viewer however it only allowed a user to view one postprocessing effect at a time; and I felt that it failed to provide an overview of the full rendering pipeline that I would expect from a tool to do with post-processing.
When the Tool doesn’t fit
I decided that I would need to create a sort of tool that I have not seen before and had no references for. I had two goals; As our groups rendering programmer I want to use the tool to edit a rendering pipeline, track resources and visualise the render logic flow, Secondly this information should be clearly presented and easily accessible to our Technical Artists. This way the TAs will have an up to date image oh how our rendering works, as well as providing an interface in which TAs can plan, test and create rendering passes for a number of effects ranging from damage vignettes, to Chromatic Aberration using any number of resources from the rendering pipeline, allowing them to hook in Shaders, Render targets, Images, samplers, etc..
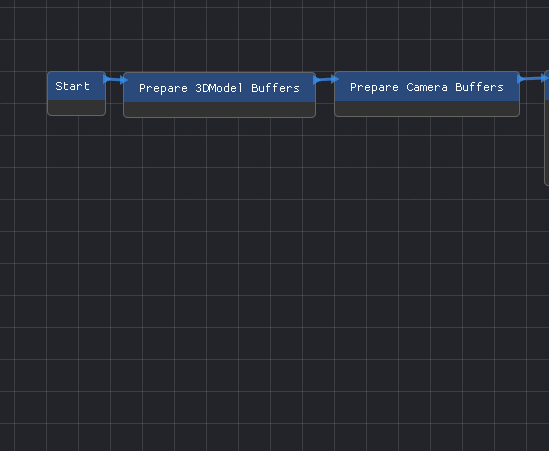
Pipeline Editor
Before I started I needed to define where a rendering pipeline starts. I started with defining it as everything that happens inside our Render Frame function, including all the sorting and packing of our data ready for rendering as well as setting the shaders and and then rendering out of our vertex & index buffers. This seemed logical to start with, and allowed us to transform our old rendering code (left) into this following graph structure (right):

Old Render Frame Functions (debug rendering is collapsed)

Graph Based Rendering pipeline
The above graph was a first iteration of the rendering graph, it had a number of basic implementations for parts that I did not want to have to spend time developing at this early stage of prototyping.
I realised a large issue instantly, how will other people know what resources exist; Samplers, Render Targets, Depth Buffers etc.. Therefore I wanted another Graph, and the need for ReNoder was born.
Resource Graph
The benefit of creating multiple graphs is that the scope of each graph become very easy to separate. While the render graph provided data required to render each frame, the resource graph could work as a one time Initialisation graph for DirectX resources. As DX11 resources utilise descriptions for their initialization I decided to hook them straight into ImGui thus creating an interface that would accurately reflect any online resources, this was further supported by functionality where the F1 key will open the MSDN webpage linked with selected resource, sending you straight to the main resource to learn what the options means.

The Nodes
The node based rendering system is made up of a hybrid of editable data and function representations. where functions and systems for things like rendering shadows and 3D models appear as a node with just a node title, this means as a rendering programmer I could continue to work on our internal rendering and optimisations of the functions that the nodes represent without the need to recreate or edit the graph. Whilst still having the nodes in the graph allows the pipeline to be more accurately communicated to a person so they can follow how resources are being updated.

Object-Oriented Design to Data Driven systems


The Nodes and Graph follow common Object-Oriented design patterns such as the nodes using inheritance to receive a private interface that connects the node to the graph and all of its functions.
by providing a simple base class a user can easily specialise the node to perform additional tasks.
In the rendering graph I added the ability to save out node Data in a binary format, consisting of a hashed TypeId that is used to parse the data into the correct functions when read back in, for the resource nodes it saved out the DirectX description elements so that it could be easily copied and the resource initialised when the package is loaded.
The Result
As you might have seen from the video at the top of the page, the tool allows a user in runtime to create and edit a rendering pipeline allowing a user to push additional post-processing passes or even disable entire parts of the rendering package.
The tool is simple to work with and very easy for me as a programmer to continue to iterate and work on whilst being backwards compatible, the fast iteration speed of using the tool means that testing and debugging visual effects is simple.
The benefits of this running in our engine means that the file formats that it produces are already ready to be utilised in our game such as changing visual effects when entering into cinematics or scene changes.
I’m extremely pleased with how the tool currently works, but there is definitely room for improvement. For example the tool cant currently save out looping logic for example multiple blur passes, this meaning each iteration has to be created manually, even with being able to copy and paste; this is a tedious tasks that also adds clutter.